Istio分步指南(三):在 Kubernetes 中使用 Istio 部署应用程序


请参阅我在deploying-istio-bookinfo-application-in-minikub上发表的第 12 条文章,以获取有关
Bookinfo应用程序的更多信息。
首先,我要提到的是 Istio 发布了一个新版本 Istio 1.0.3,您可以从以下位置查看有关该版本的更多详细信息他们的网站。同样在本教程中,我正在使用 Istio 1.0.3 部署应用程序。
作为快速浏览,首先,我们将创建一个包含两个服务的小型服务网格。一个是小的 telnet 文件,另一个是简单的 Ballerina Hello-World 服务。然后为这两种服务注入 istio-proxy 并调用它们。调用服务分为两部分,分别是从 service-mesh 内部调用服务和从 service mesh 外部调用服务。
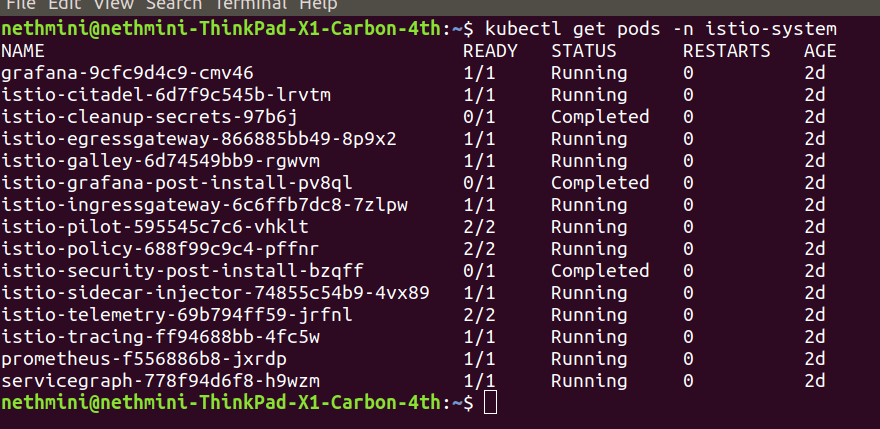
我在这里使用 Ballerina 是因为在使用 docker,kubernetes 和其他东西时非常容易。因此,如果您不熟悉Ballerina,可以访问他们的网站。有许多示例为您服务。其次,您必须正确安装 Istio,并确保所有带有”Istio-system”名称空间的 pod 都在运行。至此,让我们开始工作。
在开始工作之前,您必须通过执行以下命令启用istio-injection,
1
kubectl label namespace default istio-injection=enabled --overwrite
好吧,现在让我们开始工作。
首先,创建一个 Docker 容器映像并部署
使用以下代码创建 Docker 容器映像并将文件保存为名称 Dockerfile。
1
2
3
FROM alpine:latest
RUN apk update && apk add curl busybox-extras
ENTRYPOINT ["tail","-f","/dev/null"]
通常,当您构建 Dockerfile 时,Docker 会创建映像并将其存储在本地计算机的 Docker 注册表中。但是,在本教程中,我没有使用本地计算机的 Docker 注册表;我正在使用运行inside Minikube 的 VM 实例的 Docker 守护进程的 Docker 注册表。因此,使用以下命令将”docker”命令指向您的 Minikube 的 Docker 守护进程,
1
eval $(sudo minikube docker-env)
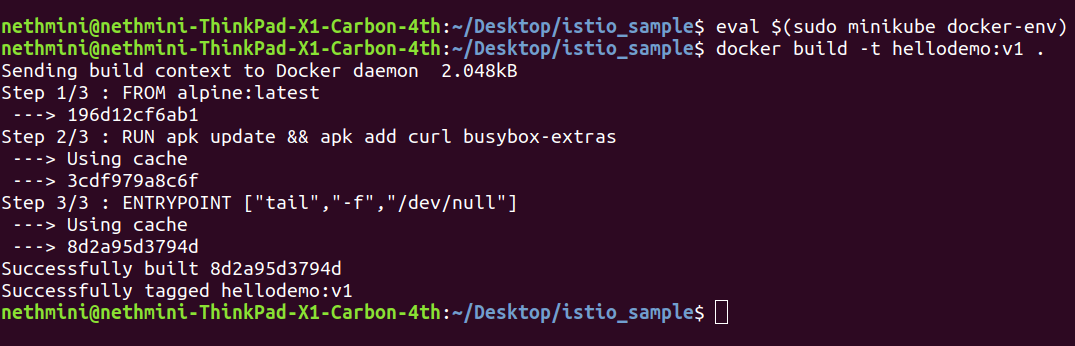
确保您位于 Dockerfile 所在的目录中。现在使用您想要的名称和标签构建 docker 映像。在这里,我使用 hellodemo 作为名称,使用 v1 作为标签。 记住使用小写字母作为名称。
1
docker build -t hellodemo:v1 .
希望您的终端中有类似的内容。
如果您要检查映像是否在 Minikube 的 Docker 注册表中,则可以通过以下方式进行操作:
1
sudo minikube ssh docker images
太好了,您已经完成了部署 Docker 容器映像的第一部分。现在将创建一个部署。
1
kubectl run hellodemo --image=hellodemo:v1 --port=9095 --image-pull-policy=IfNotPresent
hellodemo 是部署的名称,您可以检查您的部署,可以运行命令,
1
kubectl get deployments

另外,您可以通过运行以下命令来检查 Pod
1
kubectl get pods

您可以在READY列下看到2/2。这意味着在您的 Pod 中有两个容器。是的,当然必须有两个容器,因为一个是服务容器,另一个是 isito-proxy。为了进一步了解,您可以通过执行以下命令来检查 Pod 描述:
1
kubectl describe pod <pod_name>
太好了,您已经完成了部署 Docker 容器映像的第二部分。现在,作为最后一部分,您必须创建服务。为此,请运行命令,
1
kubectl expose deployment hellodemo --type=NodePort
手动负载平衡器不会与群集进行通信以找出后备 Pod 在哪里运行,我们必须使用”type:NodePort”公开服务,并且它们仅在 30000-32767 的端口上可用。
默认情况下,只能通过 Kubernetes 集群中的内部 IP 地址访问 Pod。但是,要使容器能够从 Kubernetes 虚拟网络外部访问,您必须将 Pod 作为 Kubernetes 服务公开。
您可以通过运行以下命令检查服务,
1
kubectl get svc

太好了,您已经完成了第一个任务。
现在,让我们部署 Ballerina Hello World 服务。
在此任务中,我将 IntelliJ 用作 IDE。如果使用的是 IntelliJ,则必须安装 Ballerina 插件。您可以参考此文档来安装插件。
仅供参考:此 Ballerina 服务不适用于新版本的 Ballerina。请参阅此链接了解相关工件。
首先创建一个 Ballerina 服务。 记住要选择Ballerina 服务在创建 Ballerina 文件时要使用“种类”。接下来,添加生成 Kubernetes 部署工件所需的 Kubernetes 批注。

这是带有所有 Kuberenetes 批注的我的 Ballerina 代码。
1
2
3
4
5
6
7
8
9
10
11
12
13
14
15
16
17
18
19
20
21
22
23
24
25
26
27
28
29
30
31
32
33
34
35
import ballerina/http;
import ballerina/log;
import ballerinax/kubernetes;

@kubernetes:Service {
    serviceType:"NodePort",
    name:"helloworldservice"
}

endpoint http:Listener listener {
    port:9095
};

@kubernetes:Deployment {
    image: "helloworldservice",
    name: "helloworldservice",
    dockerHost:"tcp://<minikube ip>:2376", // IP can be obtained via `sudo minikube ip` command
    dockerCertPath:"<Home Dir>/.minikube/certs",
    singleYAML:true
}
@http:ServiceConfig {basePath:"/helloworld"}
service<http:Service> hello bind listener {
    @http:ResourceConfig{
        path: "/",
        methods: ["GET"]
    }
    sayHello(endpoint caller, http:Request req) {
        http:Response res = new;

        res.setPayload("Hello, World!\n");

        caller->respond(res) but { error e => log:printError(
           "Error sending response", err = e) };
    }
}
请注意,如果使用的是 minikube,则需要指定dockerHost和dockerCertPath。
这就是创建文档的全部内容,现在将构建代码。为此,请运行命令,
1
ballerina build <.bal file name>
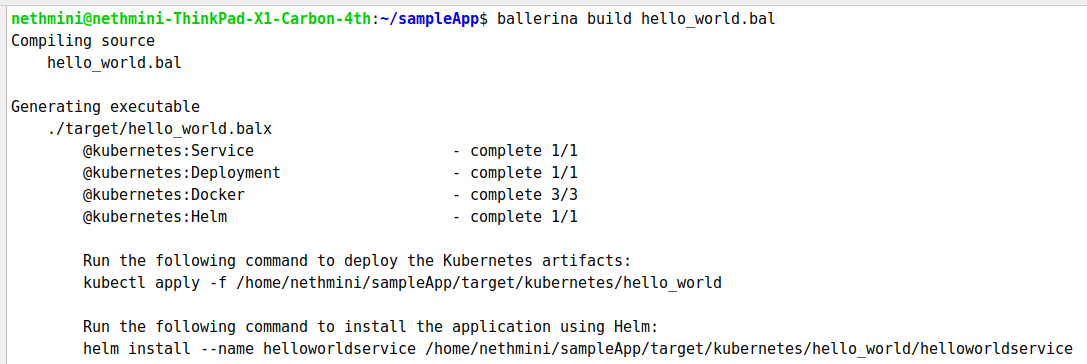
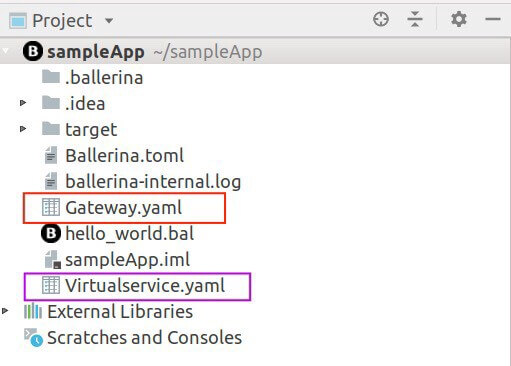
现在,如果您检查项目结构,您将找到一个生成的 YAML 文件。
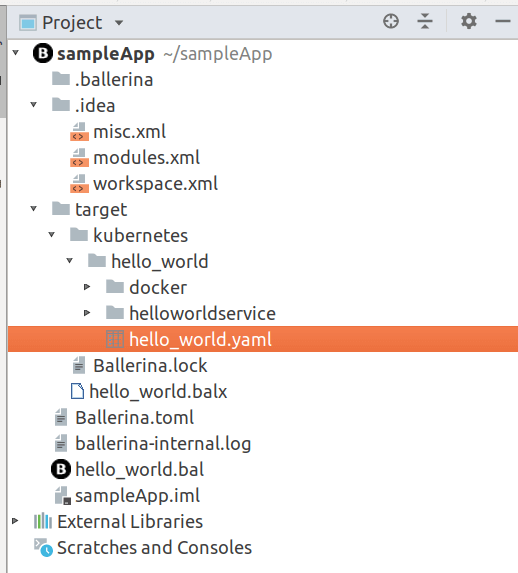
它包含服务和部署的所有配置。
然后在终端中运行命令以部署 Kubernetes 工件,并检查服务,部署和 Pod 是否正确部署。
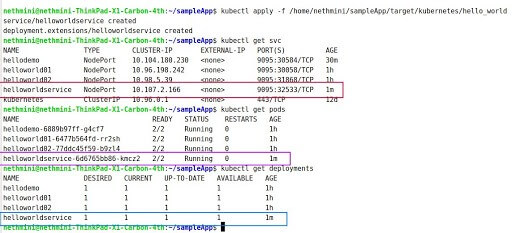
太好了,我们已经完成了本教程的两个任务。现在,我们有两个分别包含两个容器和两个服务的 Pod,以及两个部署。
从网格内部调用 hello-world 服务
好的,让我们尝试从 hellodemo 容器调用 hello-world 服务。为此,我们必须进入 hellodemo 容器并运行 curl 命令。
1
kubectl exec -it hellodemo-6889b97ff-g4cf7 -c hellodemo -- curl http://helloworldservice:9095/helloworld/

您可以在终端上看到打印为 “Hello,World”。这意味着服务被调用。
从网格外部调用服务
这是本教程的最后阶段。要完成此任务,我们需要 Gateway 和 Virtual service。您知道 Kubernetes 使用 Ingress 控制器来处理从外部进入群集的流量。但是 Istio 已将其替换为名为 Gateway 和 Virtualservice 的两个组件。
Gateway 用于配置 Envoy 的端口,而 VirtualService 用于启用智能路由首先是我们要使用 Istio 的原因。这两个协同工作以配置 Envoy。
在我们的例子中,我们需要一个 Gateway 和一个 VirtualService 来支持我们的 hello-world 服务。这是我们的服务的 Gateway 和 VirtualService。
Gateway.yaml
1
2
3
4
5
6
7
8
9
10
11
12
13
14
apiVersion: networking.istio.io/v1alpha3
kind: Gateway
metadata:
  name: helloworld-gateway
spec:
  selector:
    istio: ingressgateway # use istio default controller
  servers:
  - port:
      number: 80
      name: http
      protocol: HTTP
    hosts:
    - "*"
此网关配置设置了一个代理,以充当负载平衡器,为 HTTP 入口公开端口 80。
另一个重点是
1
2
3
spec:
  selector:
    istio: ingressgateway
在这里,完成的是,由于 istio-ingresgateway Pods 标记有标签 “istio = ingressgateway”,因此该 Pod 将成为接收此网关配置并最终公开端口的 Pod,因为它与 Istio Gateway 标签选择器匹配。
Virtualservice.yaml
1
2
3
4
5
6
7
8
9
10
11
12
13
14
15
16
17
18
apiVersion: networking.istio.io/v1alpha3
kind: VirtualService
metadata:
  name: "helloworldservice"
spec:
  hosts:
  - "*"
  gateways:
  - helloworld-gateway
  http:
  - match:
    - uri:
        exact: /helloworld
    route:
    - destination:
        host: "helloworldservice"
        port:
          number: 9095
然后可以将 VirtualService 绑定到网关,以控制到达特定主机或网关端口的流量的转发。就像上面在“规范”下的 Virtualservice 中一样,网关被分配给 helloworld-gateway,并且它将从 URI exact “/helloworld” 到达的流量转发到端口 9095 上的内部 helloworldservice。
这是项目结构。
太好了,现在将它们应用于服务组件,并尝试从外部调用它们。
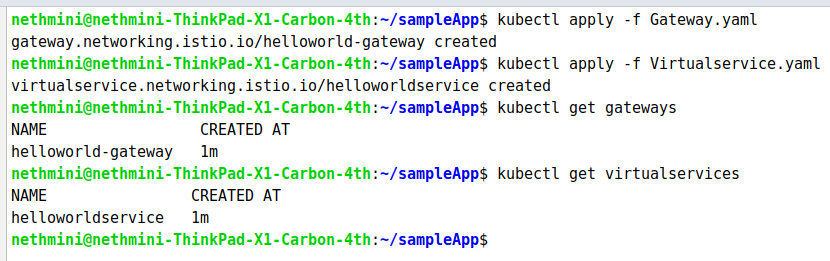
要将这些应用于服务,请运行命令
1
2
kubectl apply -f Gateway.yaml
kubectl apply -f Virtualservice.yaml
因此,要调用服务,我们必须确定入口 IP 和端口。当我们使用 NodePort 时,请使用以下命令来设置 Ingress 端口。
1
2
export INGRESS_PORT=$(kubectl -n istio-system get service istio-ingressgateway -o jsonpath='{.spec.ports[?(@.name=="http2")].nodePort}')
export SECURE_INGRESS_PORT=$(kubectl -n istio-system get service istio-ingressgateway -o jsonpath='{.spec.ports[?(@.name=="https")].nodePort}')
同样,当我们使用 minikube 时,请使用以下命令来设置 Ingress IP。
1
export INGRESS_HOST=$(sudo minikube ip)
全部设置好,让我们从外部调用服务。为此,请运行命令,
1
curl http://$INGRESS_HOST:$INGRESS_PORT/{basepath}
根据我的程序
1
curl http://$INGRESS_HOST:$INGRESS_PORT/helloworld
这是我的输出。

因此,您可以看到该服务也可以从服务网格外部调用。
您需要知道:
- 为什么从其他服务调用服务时使用端口 9095?原因是,您知道根据我们的配置,服务网格服务内部的网关正在侦听端口 9095。
这是本教程的全部内容,希望您能理解发生的基本情况。如果您需要此课程的视频教程,请在下面评论。下篇教程很快见。保持联系以了解更多信息。谢谢。